
Our town finally has a community garden. Newly tilled and fenced, but no water on site. We have a plot, 18x40 feet, facing south. I called my farmer friend for help and we planned what would go where. Since we keep the plot till Nov. 30, we'll have a second round going in when the first round comes out. I'm told that the fall garden will be even better than the summer garden!
Right now, I have about 20 feet of space for herbs. We're growing a double row of green beans, 2 hills of zucchini, 3 of yellow squash, a row of mixed tomatoes, a row of white potatoes, plus carrots, cukes, cantaloupe, butternut squash, onions, and several other things. A fair bit will end up in the pantry - tomatoes, winter squash, onions, potatoes, the herbs and so on. Some of the herbs were chosen for eating fresh - savory doesn't store well, same with chervil, and I'd like to try those. And of course, there are tomatoes, cukes and Ambrosia cantaloupe for eating fresh!
I'm growing both hybrid and heirloom varieties this year. Since I cannot save seed this year and need the best production for putting food up, it's a good compromise.
Hybrids are "plants produced by impregnating the pistil of one species with the pollen of another" (source: About.com) - you can create hybrids in your back yard. GMO is what I try to avoid; those are the ones that are "modified using genetic engineering techniques" (source: Wikipedia) - not something you can do in the backyard! I wanted to clarify that as there is sometimes confusion between to two terms.
Showing posts with label herbs. Show all posts
Showing posts with label herbs. Show all posts
Tuesday, April 19, 2011

Monday, March 21, 2011
Spring Planting
We prepped the balcony for planting today. The seeds will actually go in on Tuesday, which according to our local planting calendar is a better day for that.
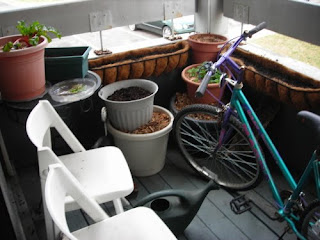

We swept, hung the manger planters, and re-arranged the furniture. The lowest level of pots (black & grey) will be sweet potatoes - I've started a sweet potato in water to grow my slips, since I only need two or three. The two pots above the black pot have herbs in them: Orange mint above and lemon balm below. The one on the grey pot will be planted with collards, as will be another 12" pot near the rosemary. The planters will be planted with cold-tolerant beets, spinach, and a lettuce mix.
 The Swiss Chard was planted last spring and survived our winter just fine. I'll add more to this pot, and start adding leaves from them to my spring salads, too.
Lemon Balm:

Saturday, September 19, 2009
For Love of Basil
Basil is one of my favorite herbs to cook with, both fresh & dried. There is a taste difference between the two, and I'd like to share with you how I preserve the flavor of fresh basil for winter dishes.
You will need:
-Fresh basil
-Olive oil (I use extra virgin cold pressed)
-mortar & pestle, or an alternative
-an ice cube tray
-a Tablespoon measure
-- Pinch off the fresh basil leaves. You don't want flowers or their buds, just the fresh leaves. Rinse them off in water and pat dry.
 -- Rip them into small pieces (or cut or dice). Place in a small bowl - I'm using my mortar & pestle here. Dribble some olive oil on them, and crush the leaves into the oil. You don't need to create a pulp but rather want to bruise the leaves into the oil.
-- Using a tablespoon, measure the crushed basil into ice cube trays. I do one tablespoon per cube for ease of measuring later. Pour a bit more oil onto them, and tuck all the green down under the surface of the oil. Put into the freezer.
-- The next day, check them. They should be completely frozen. You can add another layer of oil on the top, and freeze again, if you feel it would be helpful or there is green sticking up - you want to protect the basil.

--Whenever you are making something and want the flavor of fresh basil, toss in a cube or two. It makes even canned spaghetti sauce taste much better, & doesn't need to be thawed in advance. I try to put some up every winter.
Tuesday, August 18, 2009
Balcony Gardening
 I've cleaned the garden, mulched, and re-arranged. I do need to go back out and pull up the collards and cabbage - I lost them to cutworms. I hadn't taken any precautions, now I know better! And they ate them up in less than a week. Next time - toilet paper tubes around stalks, and cornmeal on the soil. Also more crushed eggshell might be a nice deterrent.
The picture shows the lettuce (since bolted) and a new parsley plant from the nursery. The wood in the front just looks nice and is essentially garden sculpture. Both of the garden stands you see were discards from others.
So, this summer I got a few salads worth of greens and a bit of chives. The fall planting will be when the heat breaks in September. I hope.
Related Links:
Self-Sufficiency Garden: Talks about gardening, including fruit trees, in small spaces like balconies and condo 'yards.' Includes specific varieties to try, and sources for them.
Journey to Forever: Very useful site. This page has links to more information and books about kitchen gardening in containers, without necessarily costing a great deal.
What to Plant Now: at Mother Earth News. Shows 8 US regions, and each region has suggestions for sowing (indoors or out) or transplanting, for March to September.
How Much Veg to Plant: at Grow Organic Food. Summarizes how much to grow to feed a family of two adults and three children, in regular garden rows, with suggestions for how much to harvest for each meal. The information can easily be used for most situations, I would think.
Sunday, May 24, 2009
Garden Pics

1.Top orange pot - Chocolate Mint
2.Underneath that is a very pretty volunteer plant. I have no idea what it is, but it gets no care (other than water), stays green, and cascades beautifully.
3.Right side is the 'prostrate rosemary.'
 Chives - still growing strong, after several years and occasional cat snackings.

The volunteer garlic, with yet-un-sprouted lettuce seed.


Collards (orange pot) and Cabbage, in the green pot.

And the lettuce mix.
Subscribe to:
Posts (Atom)


 Posts


